ModelLogue User Manual / ModelLogue ユーザーマニュアル
Target version / 対象バージョン: v7.x (3 model types / 3 モデル型対応) Languages / 言語: English / 日本語
ModelLogue is a tool that supports model review in software development.
ModelLogue は、ソフトウェア開発における モデルレビュー を支援するツールです。
The diagram under review is refreshed on every Apply, so it always shows the latest model at that point. Applied changes are recorded as versions, and the Undo / Redo buttons on the diagram toolbar step back and forth between them.
レビュー中の図は Apply のたびに更新され、常にその時点の最新のモデルが表示されます。適用した変更は版として記録され、図ツールバーの Undo / Redo で前の版に戻したり、やり直したりできます。
The result of a review is preserved in the evidence JSON saved via Save & finish: the source of the finally agreed model, the version history of every apply, the dialogue log that led there, the markers, and the conclusion. Markers drawn on the diagram are temporary annotations for noting review points and are not written into the exported diagram image.
レビューの成果は、Save & finish で保存する証跡 JSON に残ります。そこには、最終的に合意したモデルのソース、反映のたびの版の履歴、そこに至る対話ログ、マーカー、結論が入ります。図に付けるマーカーは指摘を書き留めるための一時的な注釈で、図の画像には書き出されません。
Links / リンク
- Application / アプリケーション: modellogue.com/app — the live app; sign in to use the AI / 公開中のアプリ。AI を使うにはサインイン
- Source code / ソースコード: github.com/sho1884/ModelLogue — MIT License; issues and pull requests welcome / MIT ライセンス。Issue・Pull Request 歓迎
- Sibling tools / 姉妹ツール: NeoCEG ・ NeoCombi — see the last section of this page / 本ページ末尾の節を参照
How this manual is organized / このマニュアルの構成
Common usage is on this page; the model-type-specific ways to write and read each model are split into separate pages.
共通の使い方はこのページに、モデル型ごとの固有の書き方・読み方は分冊にまとめています。
| Page / ページ | Contents / 内容 |
|---|---|
| This page / このページ | Screen layout, getting started, common features (chat, markers, saving) / 画面構成、はじめかた、共通機能(チャット・マーカー・保存など) |
| State machine / 状態遷移図 | States and transitions; transition table and N-switch test cases / 状態と遷移のモデル。遷移表と N-switch テストケース |
| Requirement / 要求図 | SysML-style requirement diagram; traceability and orphan requirements / SysML 風の要求図。トレーサビリティと孤立要求 |
| Process / プロセス図 | Business flow / activity diagram; scenarios, roles, artifacts / 業務フロー・アクティビティ図。シナリオ・ロール・成果物 |
Get the overall picture from this page first, then move on to the page for the model type you are working with.
まず本ページで全体像をつかんでから、扱うモデル型のページに進んでください。
Who this is for / 対象読者
- The person who reviews design models (state machines, requirements, business flows) — the facilitator. / 設計モデル(状態遷移・要求・業務フロー)を レビューする人(ファシリテーター)
- People who join the review to check the diagrams and requirements. / レビューに参加して図や要求を確認する人
Prior PlantUML knowledge is not required. You can start by writing requirements and having the AI generate the model for you.
事前の PlantUML の知識は必須ではありません。要求文を書いて AI にモデルを生成してもらう ところから始められます。
The screen at a glance / 画面の全体像
When signed in (the normal state where AI is available), the screen has four regions.
サインイン済み(= AI が使える通常状態)では、画面は次の 4 領域で構成されます。
┌──────────────────────────────────────────────────────────┐
│ Header: model-type selector / Open saved review / Save & finish │
├──────────────────────────────────┬───────────────────────┤
│  Diagram view (PlantUML SVG + markers) │                       │
│  ├ Toolbar: select/pan/ellipse/rect/arrow │   AI chat             │
│  │          Undo・Redo・export         │  (apply proposals here) │
│  ├────────────────────────────────┤                       │
│  Analysis panel: Requirements / Source │                       │
│           + per-model-type tabs        │                       │
├──────────────────────────────────┴───────────────────────┤
│ Status bar: PlantUML Server / n8n connection state          │
└──────────────────────────────────────────────────────────┘
- Left / 左側 … The model diagram (top) and the analysis panel (bottom); drag the divider to adjust the height. / モデル図(上)と分析パネル(下)。境界はドラッグで高さを調整できます。
- Right / 右側 … The AI chat; drag the divider to adjust the width. / AI チャット。境界はドラッグで幅を調整できます。
- After the shared Requirements and Source tabs, the analysis panel shows tabs specific to the selected model type (transition table, traceability, scenarios, etc.). / 分析パネルのタブは、Requirements・Source の共通タブに続いて、選択中のモデル型に応じたタブ(遷移表・トレーサビリティ・シナリオなど)が並びます。
AI is part of the normal flow / AI 連携は標準の動作です
ModelLogue reviews are designed around dialogue with an AI. In the normal state, you use the AI chat on the right to generate a model from requirements, get revision proposals, and respond to review points — all through chat.
ModelLogue のレビューは AI との対話を前提 に設計されています。通常状態では、画面右側の AI チャットで、要求からのモデル生成・修正提案・指摘への応答をチャット越しに行います。
When you are not signed in, only the input box is hidden / サインインしていないときは「入力欄」だけが出ません
The chat pane (the history of the dialogue so far) is always shown, signed in or not. On the public demo site, the only thing hidden from an anonymous viewer is the message input box.
チャット枠(これまでの対話の履歴)は、サインインの有無にかかわらず 常に表示 されます。公開デモサイトで匿名の閲覧者に対して隠れるのは、メッセージの入力欄だけ です。
- Even anonymously you can view the diagram, edit the source, use the analysis tabs, draw markers, save, and read the dialogue log of an opened review (the samples below, or a shared review, open as-is). / 匿名でも、図の閲覧・ソース編集・分析タブ・マーカー・保存に加え、開いたレビューの対話ログを読む ことができます(下記のサンプルや、共有されたレビューをそのまま読めます)。
- However, you cannot send a new message or generate a model from requirements (Generate Model). The input area shows a hint that signing in enables sending. / ただし新しくメッセージを送ったり、要求からモデルを生成したり(Generate Model)はできません。入力欄の場所には「サインインすると送信できる」旨が表示されます。
- When you want the AI, press “Sign in” at the top-right of the header. After authentication you return with AI enabled, and the input box and Generate Model become usable. / AI を使いたくなったら、ヘッダー右上の 「Sign in」 ボタンを押します。認証(サインイン)に進み、戻ってくると AI が有効化 され、入力欄と Generate Model が使えるようになります。
- On a local dev environment or an offline demo (mock-AI mode), the input box appears without signing in. / ローカル開発環境やオフラインのデモ(モック AI モード)では、サインインなしでも入力欄が出ます。
In short / まとめ: anyone can read the dialogue log; only sending (a new exchange with the AI) requires signing in. / 対話ログは誰でも読めます。送信(AI との新規のやり取り)だけ がサインインを必要とします。
Whether AI is available is decided by whether you are an authenticated user (identity), and it is ultimately enforced and protected server-side. The front-end show/hide is only a secondary aid.
AI を使えるかどうかは、認証された利用者かどうか(本人確認)で決まり、サーバー側で最終的に判定・保護されています。画面側の出し分けは補助的なものです。
Getting started (seed → review) / はじめかた(シード → レビューの流れ)
A session goes through two broad phases.
セッションは大きく 2 つの段階を通ります。
- Seed phase — where you prepare what to review: pick the model type and create the first model. / シード(Seed)段階 … これから何をレビューするかを用意する段階。モデル型を選び、最初のモデルを作ります。
- Review phase — after the first model is fixed: refine the diagram in dialogue with the AI, write in review points, and reach a conclusion. / レビュー(Review)段階 … 最初のモデルが確定してから。AI と対話しながら図を磨き、指摘を書き込み、結論を出します。
Drawn as a state machine, that flow looks like this.
この流れを状態遷移図にすると次のようになります。
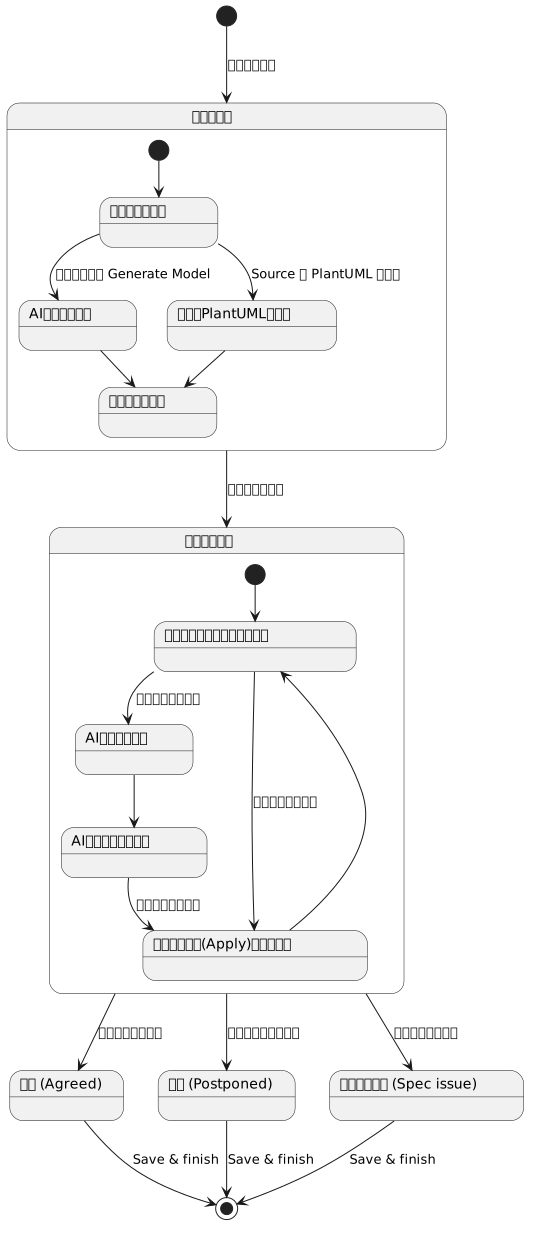
This diagram itself conforms to the state-machine subset and loads straight into ModelLogue (it was made by reviewing ModelLogue's own review process in ModelLogue). Source: review-workflow.puml.
この図自体が状態遷移図サブセットに準拠しており、そのまま ModelLogue に読み込めます(ModelLogue で自分のレビュー工程をレビューして作った図です)。ソース: review-workflow.puml
“Select model type → create the initial model” is the seed phase; the loop from “inspect the model and add markers” onward is the review phase. When you open a saved review via Open saved review…, you skip the seed and resume from “inspect the model and add markers.”
「モデル型を選択 → 初期モデル作成」までがシード段階、「モデルの確認・マーカー付け」以降のループがレビュー段階です。保存済みレビューを Open saved review… で開いた場合は、シードを飛ばして「モデルの確認・マーカー付け」から再開します。
Step 1. Choose the model type / モデル型を選ぶ
Use the “Model:” selector in the header to choose the model type you will work with (State machine / Requirement / Process).
ヘッダーの 「Model:」 セレクタで、扱うモデル型を選びます(State machine / Requirement / Process)。
- The model type can be chosen only during the seed phase. / モデル型を選べるのは シード段階だけ です。
- Once the first model is fixed it locks, and the header changes to
Model: <type>. / 最初のモデルが確定するとロックされ、ヘッダーはModel: 〇〇の表示に変わります。 - If you switch type while seed input exists, a confirmation warns that the seed input (source, requirements, chat) will be cleared. / シード中に入力済みの内容がある状態で型を切り替えると、「seed 入力(ソース・要求・チャット)が消えます」という確認が出ます。
Step 2. Prepare the first model / 最初のモデルを用意する
There are three ways.
用意のしかたは 3 通りあります。
- A. Have the AI generate it from requirements (recommended) — Paste/type the requirements the model must satisfy into the Requirements tab and press “Generate Model.” The AI generates the source for the matching model type and reflects it into the diagram. / 要求から AI に生成させる(推奨) … 分析パネルの Requirements タブに、モデルが満たすべき要求文を貼り付け/入力し、「Generate Model」 を押します。AI が対応するモデル型のソースを生成し、図に反映されます。
- B. Paste the source directly — Write/paste the PlantUML (subset) source for that model type into the Source tab. / ソースを直接貼る … Source タブに、そのモデル型の PlantUML(サブセット)ソースを直接書く/貼り付けます。
- C. Open a saved review — Use “Open saved review…” in the header to resume from a previously saved
.json(see below). / 保存済みレビューを開く … ヘッダーの 「Open saved review…」 で、以前保存した.jsonを開いて続きから再開します(後述)。
Once the first model is fixed by any of these, you enter the review phase.
いずれかで最初のモデルが確定すると、レビュー段階に入ります。
Step 3. Refine the model in dialogue with the AI / AI と対話してモデルを磨く
Consult the AI in the chat on the right. You can instruct it in natural language — “this transition is missing,” “decompose this requirement,” etc. The AI returns a revision (a new source).
右側のチャットで AI に相談します。「この遷移が抜けている」「この要求を分解して」など、自然文で指示できます。AI はモデルの修正案(新しいソース)を返します。
- Send with Ctrl / Cmd + Enter (or the Send button). / 送信は Ctrl / Cmd + Enter(または Send ボタン)。
- How a proposal is applied differs by model type (details in each page). / 反映のしかたはモデル型で異なります(詳細は各分冊)。
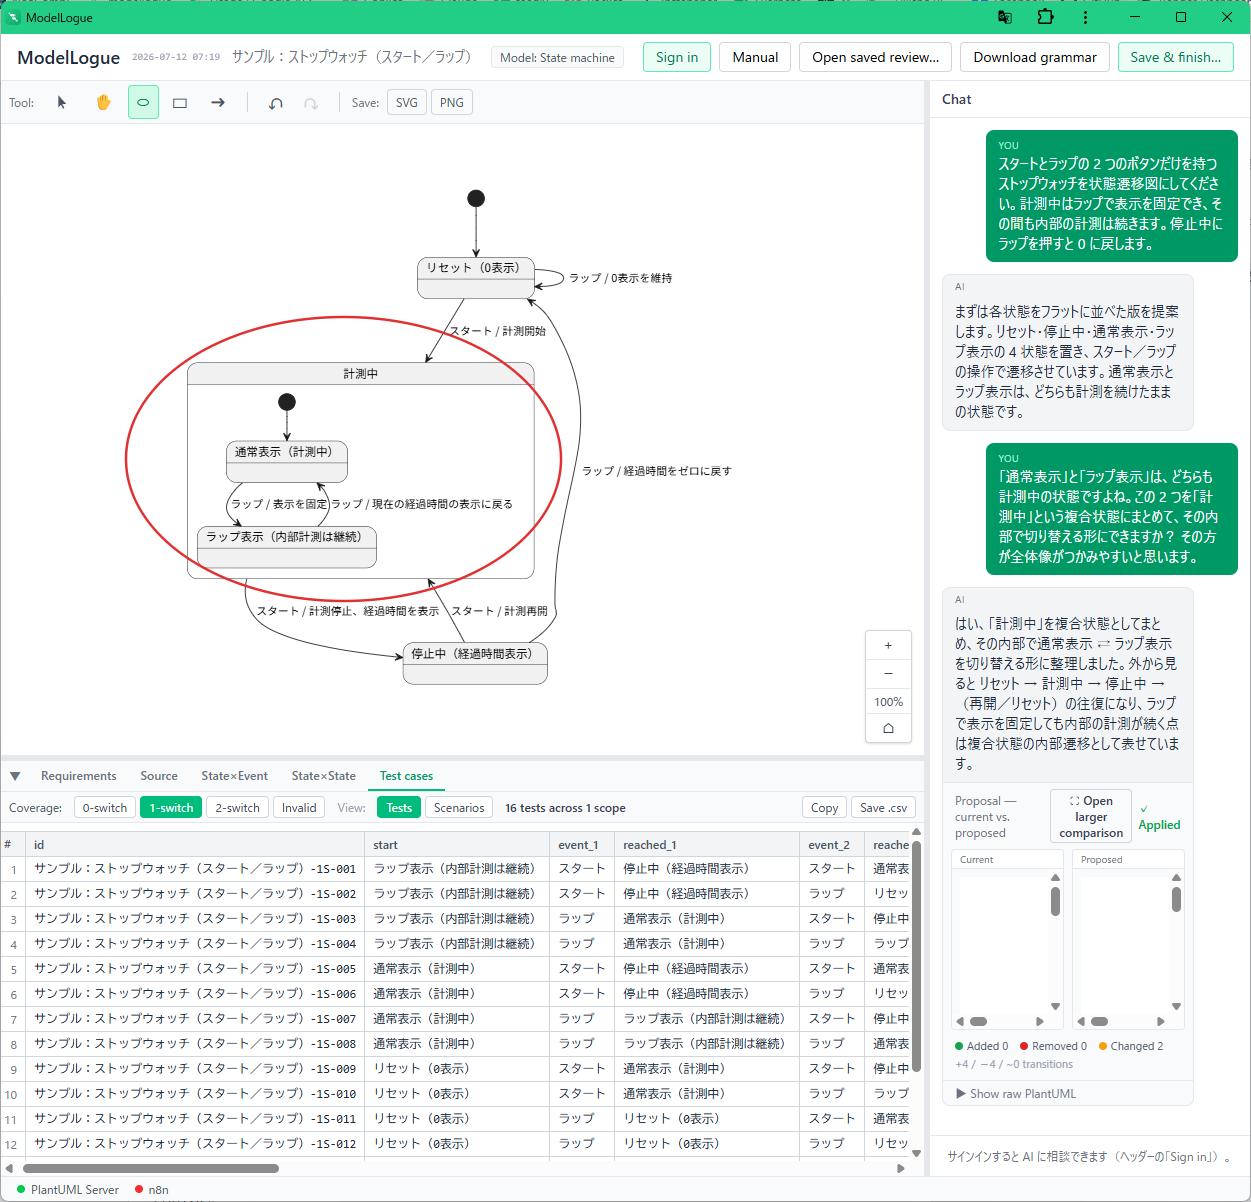
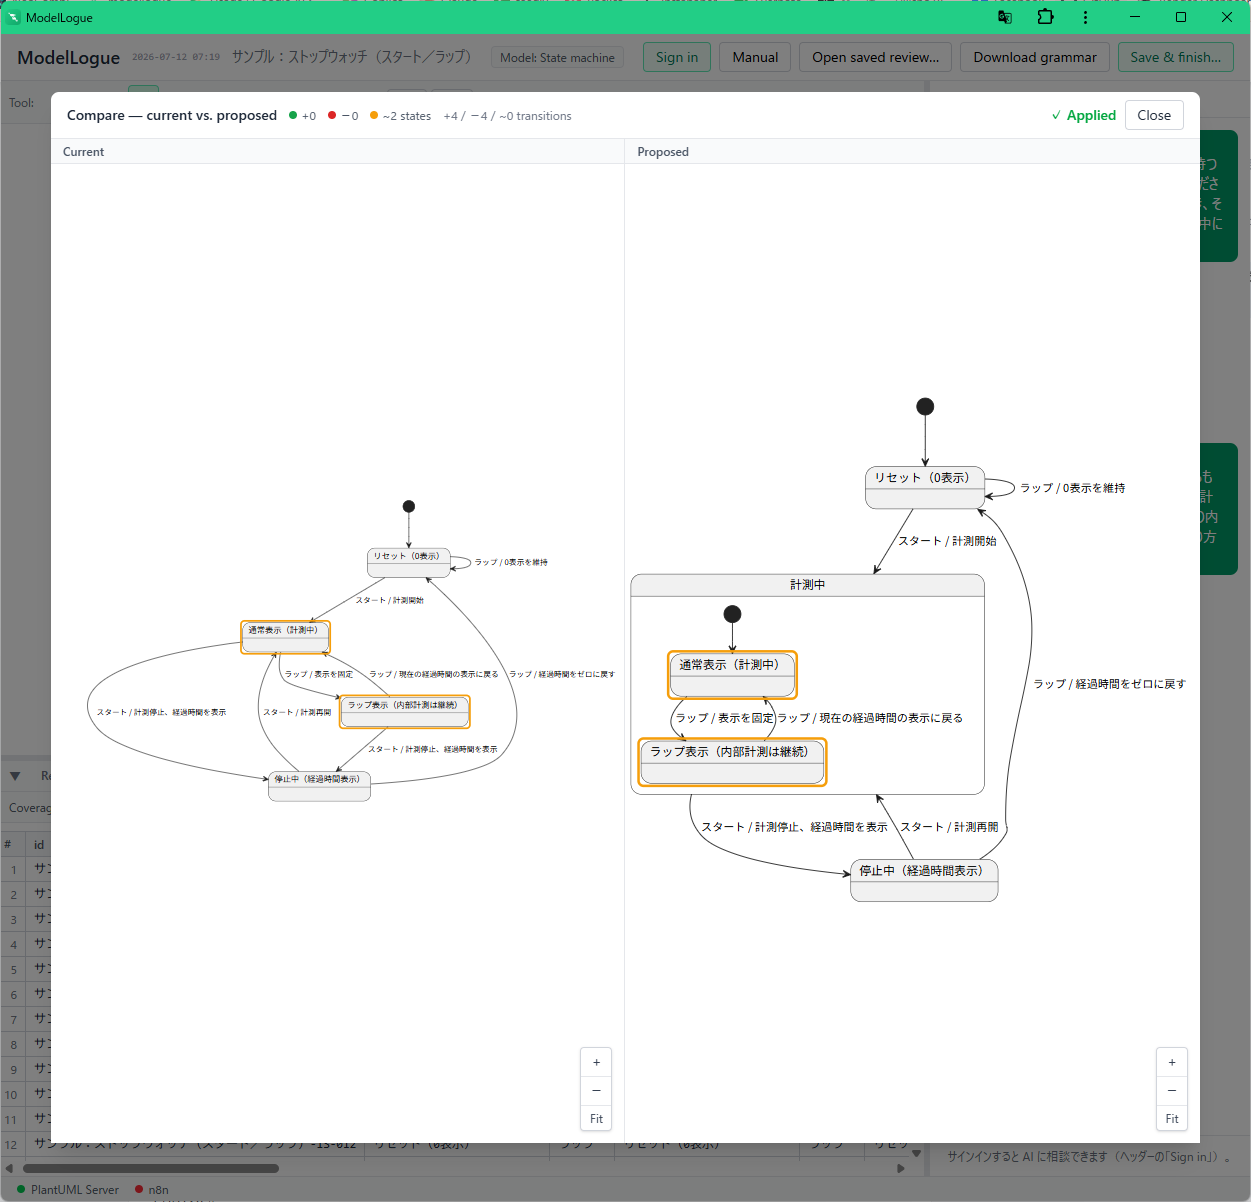
- State machine … review the before/after proposal view and Apply to reflect it. / 状態遷移図 … 変更前/変更後の 提案ビュー を見て、Apply で反映。
- Requirement / Process … proposals are applied automatically, and the changed parts are shown on the diagram with automatic markers. / 要求図・プロセス図 … 提案は 自動で反映 され、変更箇所が図の上に自動マーカーで示されます。
Step 4. Write in review points with markers / 指摘をマーカーで書き込む
You can draw review points on the diagram with ellipses, rectangles, and arrows (see below).
図の上に、楕円・矩形・矢印で指摘を描き込めます(後述)。
Step 5. Reach a conclusion and save / 結論を出して保存する
Use “Save & finish…” in the header to choose a conclusion (Agreed / Postponed / Spec issue) and download the evidence JSON that includes the conversation, model, and markers (see below).
ヘッダーの 「Save & finish…」 で、結論(合意/保留/仕様側の課題)を選び、会話・モデル・マーカーを含む 証跡 JSON をダウンロードします(後述)。
Common features in detail / 共通機能の詳細
Requirements tab / Requirements タブ
- Where you write the requirements the model must satisfy. / モデルが満たすべき要求文を書く場所です。
- Editable only in the seed phase; once the model is fixed it becomes read-only in the review phase. / シード段階のみ編集可能。モデルが確定するとレビュー段階では読み取り専用になります。
- Past a soft length limit it turns a warning color; past the hard limit (8,000 characters) Generate Model is disabled. If it is long, extract just the relevant part. / 文字数の目安(ソフト上限)を超えると警告色になり、ハード上限(8,000 文字)を超えると Generate Model が押せなくなります。長い場合は該当箇所だけ抜き出してください。
- Generate Model is a shortcut that sends this requirement text to the AI as “generate the model.” / Generate Model … この要求文を使って「モデルを生成して」と AI に送るショートカットです。
Source tab / Source タブ
- Lets you edit the PlantUML (subset) source for that model type directly. / そのモデル型の PlantUML(サブセット)ソースを直接編集できます。
- ModelLogue is not fully PlantUML-compatible; it accepts only a minimal per-model-type subset aimed at review. See each page for the supported syntax. / ModelLogue は PlantUML 完全互換ではなく、レビュー目的に絞った モデル型ごとの最小サブセット だけを受け付けます。対応構文は各分冊を参照してください。
- Each model-type page ends with the full grammar definition (EBNF) for that type. You can paste it straight to the AI as “generate following this grammar” (ModelLogue itself uses the same definition when instructing the AI). / 各モデル型のページ末尾に、その型が受け付ける 文法定義(EBNF)の全文 を載せています。これはそのまま AI に貼り付けて「この文法に従って生成して」と指示に使えます(ModelLogue 自身も同じ定義を AI への指示に使っています)。
- The header “Download grammar” button saves the state-machine grammar (
stateDiagram.ebnf) as text. / ヘッダーの 「Download grammar」 ボタンは、状態遷移図の文法(stateDiagram.ebnf)をテキストとして保存します。
AI chat / AI チャット
- The right-hand pane. Your messages are on the right (indigo), the AI on the left (gray). / 右側のパネル。あなたの発言は右(インディゴ)、AI は左(グレー)に表示されます。
- (Where Slack relay is enabled, messages from people who joined via Slack appear on the left with a green left border.) / (Slack 連携が有効な環境では、Slack から参加した人の発言が緑のふちどりで左側に表示されます。)
- When the AI returns a proposal containing “the revised source,” it leads to the proposal view or automatic apply depending on the model type. / AI が「変更後のソース」を含む提案を返すと、モデル型に応じて提案ビューや自動反映につながります。
Applying proposals, and Undo / Redo / 提案の反映と Undo / Redo
- Changes reflected into the model can be reverted/redone with ↶ (Undo) / ↷ (Redo) on the diagram toolbar. / モデルへ反映した変更は、図ツールバーの ↶(Undo)/↷(Redo) で戻す・やり直しできます。
- The Undo/Redo buttons are always shown; you can go all the way back to an empty model and redo forward. / Undo/Redo ボタンは常に表示され、空のモデルまで戻してもやり直せます。
- An AI proposal can be inspected before/after via the compare view (current vs. proposed); added/removed/changed states and transitions are highlighted. / AI の提案は、反映の前後を 比較ビュー(current vs. proposed) で確認できます。追加・削除・変更された状態や遷移がハイライトされます。
Markers (review points on the diagram) / マーカー(図への指摘)
Pick a drawing tool from Tool: on the diagram toolbar and draw review points on the diagram.
図ツールバーの Tool: で描画ツールを選び、図の上に指摘を描けます。
| Tool / ツール | Description / 説明 |
|---|---|
| Select (pointer) / 選択(ポインタ) | Select, move, and resize existing markers / 既存マーカーの選択・移動・リサイズ |
| Pan (✋) / パン | Drag the canvas to move it / キャンバスをドラッグして移動 |
| Ellipse (⬭) / Rectangle (▭) / Arrow (➜) / 楕円・矩形・矢印 | Drag to draw a new marker / ドラッグで新しいマーカーを描画 |
- Colors are auto-assigned from 4 fixed colors (red, blue, green, purple), picking an unused one. When all four are in use, delete one to draw again. / 色は 赤・青・緑・紫の 4 色 から、未使用の色が自動で割り当てられます。4 色すべて使用中のときは、いずれかを消すと新しく描けます。
- Selecting a marker shows handles at its corners (arrows: both ends) for moving and resizing. / 選択すると四隅(矢印は両端)に ハンドル が出て、移動・リサイズできます。
- Delete with the Delete key or by right-clicking the marker. / 削除は Delete キー、またはマーカーを右クリックです。
- Automatic markers (Requirement / Process) … when an AI proposal is applied, the changed parts are auto-outlined: added = solid green, changed = amber (orange) dashed. These are working cues, excluded from selection and color assignment; they disappear when the source changes and are redrawn on the next apply. / 自動マーカー(要求図・プロセス図)… AI の提案を反映すると、変更箇所が自動で枠取りされます。追加=緑の実線、変更=アンバー(橙)の破線。これは作業用の目印で、選択や色割り当ての対象外です。ソースを変更すると消え、次の反映で描き直されます。
Markers are a volatile working layer. They are not included in the diagram image export (SVG/PNG below). To keep them as a record of the review, use the Save & finish evidence JSON (markers are saved into the JSON). / マーカーは 揮発的な作業レイヤー です。図の画像エクスポート(下記 SVG/PNG)には含まれません。レビューの記録として残したい場合は、次の Save & finish の証跡 JSON を使ってください(マーカーも JSON に保存されます)。
Diagram controls and image export / 図の操作と画像保存
- The zoom controls at the bottom right offer + / − (zoom in/out), 100% (actual size), and ⌂ (recenter). You can also zoom with the mouse wheel. / 右下のズームコントロールで + / −(拡大・縮小)、100%(等倍)、⌂(中央に戻す) ができます。マウスホイールでもズームできます。
- Save: on the diagram toolbar exports the model diagram as SVG (vector) or PNG (image). Markers are not included. / 図ツールバーの Save: で、モデル図を SVG(ベクター) または PNG(画像) として保存できます。マーカーは含まれません。
Save & finish (saving the evidence) / Save & finish(証跡の保存)
From “Save & finish…” in the header, choose the review's conclusion and download the evidence JSON.
ヘッダーの 「Save & finish…」 から、レビューの結論を選んで証跡 JSON をダウンロードします。
- Choose one Outcome. / 結論(Outcome) を 1 つ選びます。
- Agreed … all concerns resolved, the model approved. / すべての懸念が解消され、モデルが承認された。
- Postponed … open points remain; continue in a follow-up review. / 未解決の論点が残る。フォローアップのレビューで続ける。
- Spec issue … the problem is upstream; the requirements side must be fixed before the model can move on. / 障害は上流にある。要求の側を直さないとモデルを進められない。
- Optionally leave a note. / 任意で メモ を残せます。
- Download JSON downloads a single file containing: the final source, the requirements text, the full chat log, the source history of every apply, the markers, the conclusion and note, and session info. / Download JSON を押すと、次を含む 1 ファイルがダウンロードされます。最終ソース、要求テキスト、全チャットログ、反映のたびのソース履歴、マーカー、結論とメモ、セッション情報。
Open saved review (resume) / Open saved review(再開)
Open a saved .json from “Open saved review…” in the header.
ヘッダーの 「Open saved review…」 で、保存済みの .json を開けます。
- Opening a full review with a conversation (saved via Save & finish) restores the conversation, history, markers, and model in full, so you can continue the discussion. / 会話を含む 完全なレビュー(Save & finish で保存したもの)を開くと、会話・履歴・マーカー・モデルまでまるごと復元され、議論の続き ができます。
- Opening seed material without a conversation (a file with only source or requirements) starts a new session seeded from it. / 会話を含まない シード用の素材(ソースや要求だけのファイル)を開くと、それを種として新しいセッションを開始します。
- Launching with
?file=<URL of the JSON>in the URL loads that JSON at startup (a way to open a publicly hosted review with a single link). Loading happens regardless of sign-in, and no authentication is needed to view the loaded content. / URL に?file=<JSON の URL>を付けて起動すると、その JSON を起動時に読み込みます(ネット公開されたレビュー証跡を、リンクひとつで開くための仕組み)。読み込みはサインインの有無に関係なく行われ、読み込んだ内容の閲覧に認証は要りません。
Open an example (samples) / 例を開く(サンプル)
You can load a published sample review with a single link and check its diagram, dialogue log, and conclusion in the tool.
公開しているサンプルのレビュー証跡を、リンクひとつでツールに読み込んで、図・対話ログ・結論を確認できます。
- ModelLogue's review process (a record of reviewing ModelLogue's own review workflow as a state machine) / ModelLogue のレビュー工程(ModelLogue 自身のレビュー作業を状態遷移図でレビューした記録)
- Open in the app / アプリで開く: open on modellogue.com →
- View the JSON directly / JSON を直接見る: review-workflow.json
- Stopwatch (start / lap) (a record of reviewing a two-button stopwatch as a state machine; an example that groups “計測中” as a composite state) / ストップウォッチ(スタート/ラップ)(2 つのボタンだけのストップウォッチを状態遷移図でレビューした記録。「計測中」を複合状態でまとめた例)
- Open in the app / アプリで開く: open on modellogue.com →
- View the JSON directly / JSON を直接見る: stopwatch.json
“Open in the app” opens directly on the live modellogue.com/app (the app is under /app, not the site root). If you host it at a different address, read https://modellogue.com/app as that address. A .json you saved locally can also be opened from “Open saved review…” in the header. More samples are planned.
「アプリで開く」は、公開中の modellogue.com/app でそのまま開く例です(アプリはサイト直下ではなく /app 配下にあります)。自分で別のアドレスに公開している場合は、https://modellogue.com/app の部分をそのアドレスに読み替えてください。手元に保存した .json は、ヘッダーの 「Open saved review…」 からも開けます。サンプルは今後増える予定です。
Status bar / ステータスバー
At the very bottom, the connection state of the PlantUML Server (diagram generation) and n8n (AI relay) is shown as green (connected) / yellow (checking) / red (disconnected). Use it to isolate a problem when a diagram does not appear or the AI does not respond.
画面最下部に、PlantUML Server(図の生成)と n8n(AI 中継)の接続状態が緑(接続)/黄(確認中)/赤(未接続)で表示されます。図が出ない・AI が応答しないときの切り分けに使えます。
What to read next / 次に読む
- Review states and transitions → State machine / 状態遷移図 / 状態と遷移をレビューする
- Review requirements and traceability → Requirement / 要求図 / 要求とトレーサビリティをレビューする
- Review business flows and procedures → Process / プロセス図 / 業務フロー・手続きをレビューする
Sibling tools / 姉妹ツール
ModelLogue is one of three tools that share a text design source and one coherent architecture, introduced together at modellogue.com.
ModelLogue は、テキストの設計ソースと統一感のある構成思想でつながる3つのツールの一つです。 まとめて modellogue.com で紹介しています。
| Tool / ツール | What it makes explicit / 何を明示するか | Manual / マニュアル | Source / ソース |
|---|---|---|---|
| ModelLogue (this tool / 本ツール) | State machines, SysML requirement and process diagrams, designed and reviewed in dialogue with AI; N-switch tests from a state machine / 状態遷移・SysML の要求図とプロセス図を AI との対話で設計・レビュー。状態遷移から N スイッチテストを生成 | this manual / 本マニュアル | GitHub |
| NeoCEG | The logic that derives an outcome, as a cause-effect graph → decision table / 結果を導く論理を、原因結果グラフ → デシジョンテーブルとして | Docs / ドキュメント | GitHub |
| NeoCombi | The input space and the combinations worth trying / 入力空間と、試すべき組み合わせ | Docs / ドキュメント | GitHub |
All three treat a text source as the design artifact and publish its grammar as an EBNF specification, so an AI can write a first draft that you then review in the tool — the same working style as the grammar definitions in this manual. All three are MIT-licensed and free to use.
3つとも テキストのソースを設計の実体 として扱い、その文法を EBNF 仕様として公開しています。AI に下書きを書かせ、ツール上でレビューするという進め方は共通です(本マニュアルの文法定義と同じ考え方)。いずれも MIT ライセンスで無償で使えます。
Where the handover happens / どこで引き継ぐか
- A transition guard that hides real decision logic (several conditions combined) is where NeoCEG takes over: model the logic as a cause-effect graph and get the decision table. / 遷移の ガード条件 に複数条件の論理が隠れているときは NeoCEG の出番です。論理を原因結果グラフで表し、デシジョンテーブルを得ます。
- Test cases: a state machine yields N-switch cases in this tool (Test cases tab); the input space of a screen or an API yields pairwise sets in NeoCombi. / テストケース:状態遷移からは本ツールで N-switch を(Test cases タブ)、画面や API の入力空間からは NeoCombi でペアワイズを得ます。
- The process diagram shows who does what in what order; NeoCEG and NeoCombi cover what a single decision or a single input space contains. / プロセス図は「誰が・何を・どの順で」を、NeoCEG と NeoCombi は「ひとつの判断・ひとつの入力空間の中身」を扱います。